
You will find many and many HDR tutorials on the web, here are just a few more tips which can help people trying HDR photography in their landscapes works. These tips are a little about HDR theory, mostly about how to practice in the field and also a little about file processing.
1 - HDR THEORY
HDR is for High Dynamic Range and of course it can be used to photography some scenes having a too strong contrast for a common camera sensor.
Making a HDR image requires taking several exposures of the same scene and blending these different exposures with a dedicated software. The blending result is the real HDR image. Because of its high dynamic range, this HDR image can't be viewed correctly on a usual computer display and neither printed on paper.
To make a viewable photo from the HDR image you need to make it's total contrast fit the capabilities of classic digital images. This part of the process is named tonemapping. There are many tonemapping algorithms giving all some very different results. I think the most popular is the Detail Enhancer implemented in Photomatix.
Even if the overall dynamic range of the scene is not really too high for the camera sensor you can use HDR technics to improve shadows and or highlights rendition or to increase local contrasts.
You can also use the tonemapping algorithm on a single exposure to give it more power. It's just tonemapping and not HDR. It can produce some very impressive results but take care because it can also strongly enhance the defaults of the original file (noise, banding, etc).
If you want to know more about the history and theory of HDR Imaging i can just conseil you to read this Wikipedia page and also the Photomatix FAQ about HDR.
2 - IN THE FIELD
- First and always shoot raw ! It will give you some really better files to work on during the digital processing.
- Use a tripod, a sturdy one and don't forget to lock all the parts you can lock. It will increase image sharpness and help to avoid misalignment problems at blending time.
- Still to avoid misalignment, try too shoot without touching the camera. Use a remote controler or the interval shooting option if your camera has one.
- Exposure, number of frames etc :
- On your camera, select aperture mode and choose the aperture you will use for the landscape. As for a classical landscape, the aperture will depend of your lens capabilities, your need for slow or high shutter speed, your need for DOF, etc...
- Put your camera on spot metering and take the light in the brightest and in the darkest parts of the scene. Note the corresponding shutter speeds, compute the average and the number of IL you will need to cover all the dynamic range of the scene.
- Put your camera in manual mode and then select the aperture you choose in first point and also the average shutter speed you have just computed.
- Program your camera bracketing to cover the full dynamic range of the scene. If you feel limited by the bracketing capabilities, remember that one exposure captures really more than one IL :)
The goal is to have at least one frame whith the shadows slightly overexposed and an other with the highlights slightly underexposed.
3 - DIGITAL PROCESSING
It will be a short part. I won't try to tell you how to use the Photomatix sliders, i think it all depends of your tastes and of the type of image you're working on.
- Raw files. I usually process them with SilkyPix, save the results in 48 bits TIF files and then blend these TIF files with Photomatix.
I find i have more control on the processing doing this way but if you don't have any raw processor you can process them directly in your HDR tool. - Usually, HDR softwares have an auto alignment option. If you respect all the points listed above i suggest you to try without this option. You will save time and possibly avoid some misalignment due to false software interpretation of some image points.
- One thing we often read is that HDR images are noisy. If all the frames are correctly exposed and if you're not too crazy during tonemapping you can obtain some noise free images without using any noise reduction.
So once more, if you want a noise free result try to expose correctly your images and skip the noise reduction option. You will save time and avoid artifacts and loss of details. - Chromatic aberration :
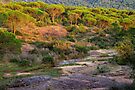
Most of time, HDR landscapes concern scenes with high contrast and it's a nice way to test your lenses about chromatic aberrations. Speaking seriously, i would tell Make your possible to avoid and/or reduce chromatic aberrations.
The colored fringes can be "nicely enhanced" by the "Details enhancer" algorithm of your tonemapping software and so become realy disgracious on a large print. I also think they can produce alignment errors when using an automatic alignment option at processing time.
Today, some softwares are very good in correcting chromatic aberrations but if you can afford try tu use a lens which doesn't suffer too much of this defect. - Last point : Most of time the tonemapped image can be strongly improved by some slight curve tweaks in your favourite photo editing software ...


3 comments :
This is such a well written article in deed.
I benefit from such a succinct write up
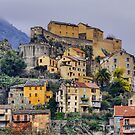
Very informative and I love the picture you have taken, such finesse...
Way tech-y stuff, above my level. But I enjoyed finding out about it.
Your photo on this is a winner.
I think I'm partial to your seascapes.
Post a Comment