Showing posts with label workflow. Show all posts

Wednesday 11 June 2008

Digital darkroom power

Mediterranean seascape
I'm shooting digital since the end of the 90'ies but i'm still amazed by the power of the digital darkroom.
I'm writting this post in front of two fresh prints of the images posted here. Nobody could tell how much these photos were processed. They both come from the same raw files and just differ by the post processing.

A little more :
At the begining were 5 exposures from the same frame with one EV increment between each. I converted them to 5 tif files and then blended theses new images using several masks to obtain the photo shown on the top of this article.
The bottom photo is just a variation of the above one.
I've re-processed the first resulting image to obtain 3 new tifs simulating 3 exposures (still 1 EV increment). Once more i used masks (geometric, brush, tones) to blend these 3 new tifs into a new one to which i finally applied some little tones and colors tweaks ...

Of course, the first image looks very more natural than the second one but i'm not sure about the one i'll hang on my wall...

Mediterranean seascape

Friday 26 October 2007

That's about fine art photography

Parasol pines forest landscape
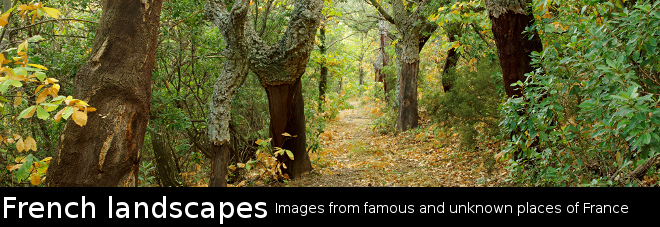
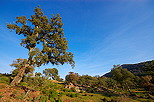
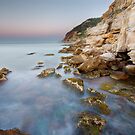
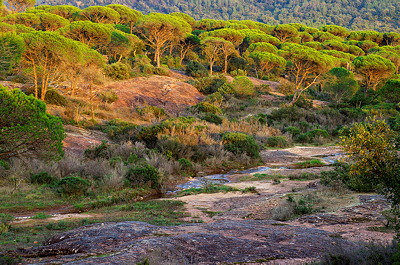
Parasol pines forest in Provence
Forêt de pins parasols en Provence

How could i define fine art photography ?
What is a fine art photograph ?
What fine art prints are ?

First, i think that with fine art photography, the term making a photograph is more correct than taking a photograph.
A fine art photograph must reflect the photographer vision before featuring the reality. When i'm in the field to make a photo, i know what i want her to look like before looking threw the viewfinder or pressing the shutter release. And that's not only about framing but also about colors and contrast rendition.
Making the photo just starts by beeing there and looking at the scene with my mind and heart.

When the camera has captured the scene, starts the second part of the making process.
In the digital darkroom, i develop the raw file to produce a digital image looking like the scene i have in mind. When done i make a first print at around 7x10". Then i check the print, eventualy make some file adjustments and print at 12x18". If this second print looks OK, i archive and backup the file, if not i continue with file adjustments ...

About photography, digital and printing equipement :

Making a fine art photograph can be very time consuming and a good equipement can avoid disappointments about image quality after a long work.

Lenses :
The lens realy makes the image that will be seen by the camera sensor. A good lens can ensure sharpness and can avoid distorsion, corners shading or artifacts like chromatic abberation.

Camera body :
A good viewfinder can realy help with framing and focus checking.
The sensor quality will permit (or not) to capture a raw file containing all the colors and luminosity informations about the scene. With a good sensor (and good settings) it's possible to have noise free shadows and respected highlights.

Computer screen and software :
The computer screen is a master piece during all the digital workflow. He shows me what i do when i adjust the image file. So it's realy important for me to have a perfectly calibrated and profiled screen. In the same way i only use fully color managed software.

Printers, papers ans inks :
Today all pro photo inkjet printers can deliver wondeful prints. Once more if some wants a print to look like what he has in mind or what he sees on a computer screen, he must use a fully color managed system. Profiles must be done for each paper / ink combinations.
Last thing : It's possible to make some very nice fine art prints with non archival papers and inks but in this case selling them can be a little more delicate ...

I'm realy not a technology addict but all this stuff is here to produce prints featuring with the most fidelity and the best quality what i have in mind.

Fine art prints of the image above are for sale in my Etsy Shop.

Thursday 17 May 2007

SilkyPix a nice raw converter

Provence landscape posterAs said in other posts, i always shoot raw to keep all the data my camera can capture. So the raw converter is a big key of my post processing workflow and choising the good software is very important. For more than one year i process all my raw files with SilkyPix.
It can process the raw files from near all digital cameras and if i'm not wrong from some digital backs. I mostly use some Nikon DSLR but i also have some cameras of other brands and it's nice to be able to use always the same tool for raw conversion.
SilkyPix has near all the functions someone can hope from a raw converter and the resulting files are of a very high quality.

White balance can be set to many predefined options or processed by SilkyPix. In all the cases it can be manually tuned in many ways.

Color rendition can also be tuned by editing color curves and/or use some predefined models. Still about colors, the software has a nice tool to make some selective fine tunings.

Same thing for tone and contrast : you can choose some predefined settings and/or edit it by tuning the tone curve or using some sliders to change contrast, gamma and black level.

SilkyPix also have many options for sharpening and noise reduction and it's not so hard to obtain some very clear and detailed photos.

So, what's wrong :
The highlights recovery tool is not of an easy use. It's better you don't overexpose your photos.
I think it's missing an easy tool to push up the shadows like the DLightening tool of Nikon Capture.
I'd like to be able to compare side by side two versions of the same raw file processed with different parameters.

Friday 20 April 2007

A few words about panoramic photography

panoramic lake landscape
I always loved panoramic landscapes, with digital photography, stitching images has become very popular and stitching softwares very powerful.
I own 2 QTVR panoramic heads, one pro and one cheap.
The cheap one presents for me 2 issues. First it's long to setup in the field and second it's not rigid enough to ensure a very good image sharpness with some lenses.
The pro one is better but i don't always have it in my bag ...
So most of time i just use my tripod with its standard rotule head and a bubble level.

After the shooting session, digital workflow is still the same :
With the earliest versions of PTGui, we had to manually set up the control points. With the recent versions this time is gone and PTGui offers two different ways to automaticaly find these points. Its blending capabilities has also evoluated with the versions and you can now obtain rapidly some stuning results if you take a little care while shooting.

Monday 16 April 2007

Shooting method and digital workflow

landscape and nature photography
I always have in mind a few places to go.
Depending of weather and of my envy, when i think conditions are good i take my equipment and go.
I usually carry one DSLR with 3 or 4 lenses and one tripod.
Tripod is one of the most useful part of the landscape photographer equipement. Mines are always lights and small (when folded) so i can always have one with me.

When the light is the best its rarely strong, for landscapes i very often shot at f:14 or smaller aperture to ensure a great deep of field. The consequence is a low shutter speed and the tripod is sometime not enough and i don't hesitate to use a remote control or the camera self timer with mirror locking.

Back to the office, starts the post processing session.
  • Renaming, sorting, examining and selecting files to keep.
  • Processing raw keepers with SilkyPix.
  • Further adjustments with Picture Window Pro.
  • Backup.

panoramic lake landscape
Related Posts Plugin for WordPress, Blogger...